Filed under: Anaglyphs
Hi, haven’t updated in a while. Get your 3D glasses out again, an interesting anaglyph site has come to my attention,
Thanks to Tom for this one.
You can download the Project Documentation here:
You can download my Self Evaluation here:
You can view my final artefact here:
(this is 80mb, beware of log download if you have a slow connection, or even if you have a fast one for that matter)

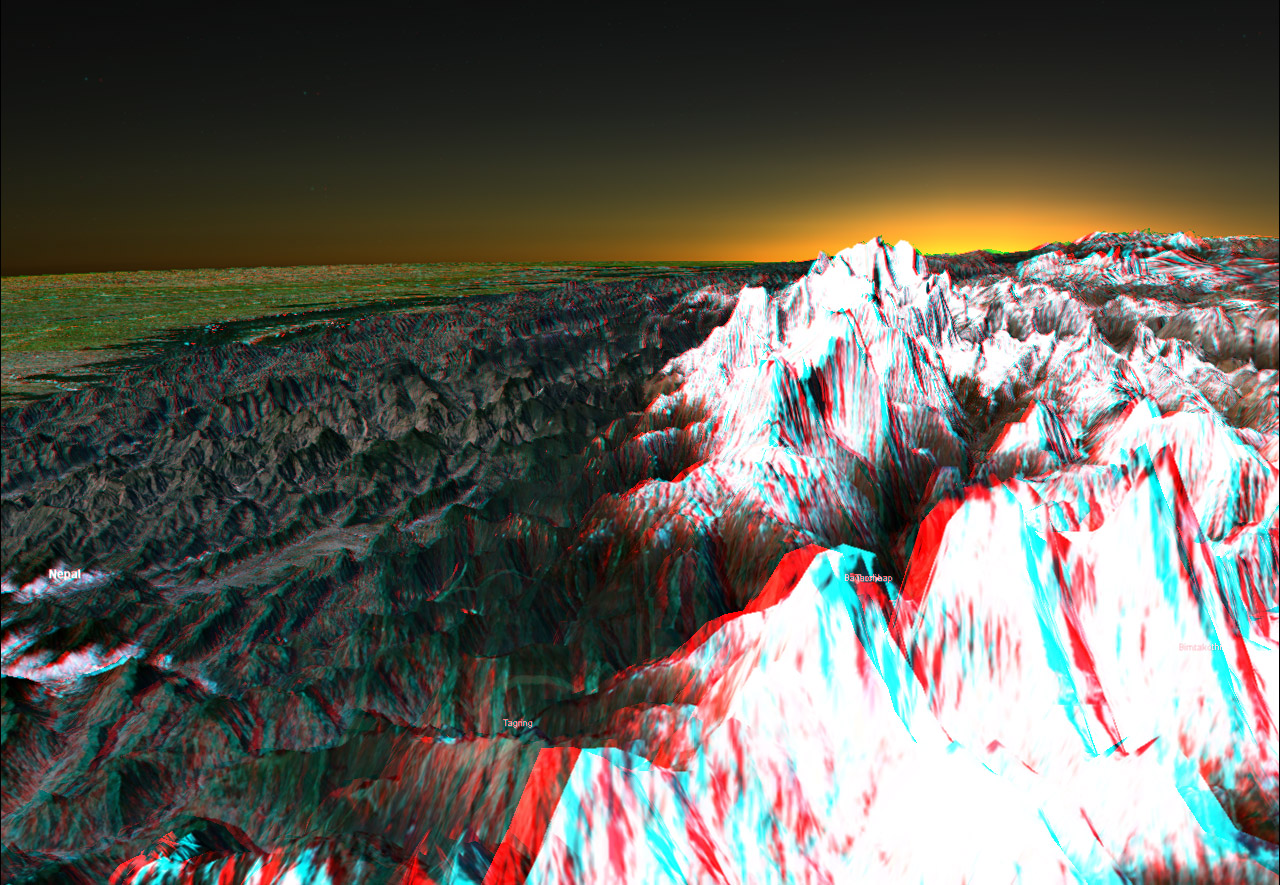
Ever seen the sun set over the Himalayas? NASA’s answer to Google earth has fantastically detailed displacement maps of Earths terrain. There are loads of different views and options for viewing the planet, plus you are not confined to our own planet, the other current available destinations are, the Moon, Jupiter, Mars, Venus and a very detailed section of the stars viewed from Earth. There are other options such as sunlight and atmospheric scattering, which you can see in the above screen shot.
However unlike Google Earth, World Wind doesn’t have very detailed images of cities, so zooming in really far will not produce very interesting results. It’s still really fun to play with though, I think controlling the camera navigation in World Wind works a lot better than the one in Google Earth. If only they combined powers!
Also at the moment you have a single planet view and when you change planet everything goes blank and re-loads. It would be so much more fun if you actually navigated to the next planet as if you were flying around the solar system. I suspect that it is like this currently because when you navigate the planet you are actually dragging the planet around a static camera rather than the other way around. I think the navigation should be more like a first person shooter, it would take a bit longer for a non-gamer to learn but it would be so much better!
Another great feature is the Anaglyph mode! Check out the above shot with some 3D Glasses. N.B they have got the red and blue the wrong way around, you’ll have to wear the glasses upside down:
Links:

This idea believe it or not came to me in a dream! (boring dreams eh?)
I have ‘built’ a home made interactive, tilt / pressure sensitive screen. All I used was my normal Wacom tablet (Intuos 3) and the mini projector borrowed from uni. It is extremely simple and crude. I strapped the projector to my tripod with cello-tape and mounted it above my Wacom tablet which was on the floor. I used a dumb bell to counter the weight of the projector on the tripod.
Wacom have their own screen tablet with their Cintiq range, however these are very expensive. This is in essence a cheap version of that product without any dissecting of valuable equipment.
Although this is a fairly interesting solution, there is a slight lag between the tablet and the screen. The biggest draw back though is that because the surface of the tablet is so smooth to avoid damage to the pen, you get quite severe glare from the projector above, a problem which would not be an issue in Wacom’s own Cintiq tablet.
I have created a video of the setup and a demo of me using the tablet:
InteractiveScreenDemo_LoH264.mov (H264, 360 x 288px, 12mb)
The end of the video shows a short clip of my anaglyph animation running on the wacom screen. A possible idea for my final project would be some sort of an interactive anaglyph programme running on this set up.
I have found a similar project to this. Some nutta has built a Wacom tablet screen by taking apart a tablet and a LCD screen and combining them together. This would probably work much better than my version, however taking apart all that equipment can be risky and expensive, my way avoids any of that risk.
Links:
DIY wacom screen at BongoFish.co.uk
The BongoFish screen in action (YouTube)
Wacom Cintiq
Wacom Europe
I have always had an interest in these beautiful mathmatically generated artworks. I have recently been exploring fractals created in 3D. I have found a PDF file written by Dominic Rochon that seems to be a university lecture on the history of fractals and creating them in 3D. The problem is that it is all explained in bullet points and nothing is explained. You can however get the jist of the information and it is fairly interesting. You can get the PDF here:
Whilst looking into 3D fractals, I stumbled upon this web page that contains a java applet displaying 3d fractals that you can view as an anaglyph with 3D glasses. At the bottom of this page are some links to other anaglyph applets.
Etude Number
3
Your name
Russell Etheridge
Your Pathway Combination
Digital Arts Specialist
The title of your etude
Analgyph Animation Test
A short statement of intentions
I want to see how Red / Blue 3D Glasses Anaglyph techniques will apply to different kinds of motion in an animation. The idea is to create a short series of interesting motion experiments and see what kinds of motion and shapes are most effective when viewed as an anaglyph. I intend to create this animation in 3D Studio Max using the Vray renderer which I am quite familiar with in conjunction with the recently acquired Xidmary plugin that allows adjustable dual perspective rendering.
Conceptualisation of the work
Leading up to the production of this etude I started off exploring the various methods involved in producing anaglyphs. Although I had a fairly good idea of the process of combining two images from different perspectives in Photoshop to achieve the anaglyph effect, it was still useful to look at a tutorial which would give me more detail into the reasons behind each step. The tutorial I found here (How to Make an Anaglyph with Photoshop) was particularly useful. Following the tutorial I produced various anaglyphs by taking two photos with my digital camera from different views in and around my house. You can find the best of these experiments in my post here (Anaglyphs).
After a lot of hunting around and forum discussions into compatibility issues I found the Xidmary plugin for 3D Studio Max. This plugin allows you to simultaneously control two cameras in 3DSMax of which you have full control over their distance apart and rotation (scale and focal distance respectively when applied to anaglyphs). The plugin allows you to render the 3DSMax scene from each eye separately, it is then up to you to combine them together in an image editor such as Photoshop to achieve the anaglyph effect. Following the acquisition of this plugin I produced a couple of stills to test the plugin. You can find the stills I made in these posts (Max 8 Stereo Image Renderer, Another 3Dsmax Anaglyph)
After these tests I wanted to create an anaglyph of an object in motion that also looked pretty realistic, so I produced the following image which can be found in this post (Another analgyph test).
Describe and depict what the actual concept of the etude is
The purpose of this etude is to experiment into what types of shape and motion are most effective when viewed as an anaglyph. This etude will be a useful insight to my larger project where I may carry on with an anaglyph or similar experience for the audience.
I think the use of anaglyph technology has perhaps been overlooked as a serious medium due to it’s poor colour definition, it’s slight strain or discomfort on the eyes and the fact that you have to wear specially made glasses that, lets face it, are something everyone owns but no one can remember where they are. However it is always a novelty and will appeal to most people if they have access to the glasses.
As a 3D Hybrid I see this study as a hybrid between old and new technology. When the anaglyph technology was invented the only way to utilise it was to use two cameras shooting on two rolls of film simultaneously. However, with the advent of computer generated 3d imagery the technology has a chance to be created very easily by someone with minimal knowledge of most 3D applications.
With this study I hope to produce an interesting 3D experience for the audience that will enjoy the fluid motion and realism of the 3D effect and also appreciate the technical process behind it.
Documentation of Technical and Artistic Process
You can see the final video and a description of the process in the following post:
3D Anaglyph Animation
Technical Analysis
During this etude I have vastly increased my knowledge of creating anaglyphs. I now know the requirements of the scene set up that will make the 3D effect see as though it is behind the viewing surface (the computer screen) and also what makes it seem to pop out. I have also discovered that textured or highly detailed objects add to the 3D effect much more than flat featureless objects.
Extremes in closeness and distance don’t work particularly well if viewed for long periods. For example at the end of my animation when the particles are flying around it is difficult to focus on the close ones without straining your eyes. However it is very effective when the final particle whizzes past your head. The shorter the amount of time that the object is really close the better.
References
Below is a link to all the research I have done into anaglyphs and the process of creating them:
Anaglyphs
How successful is the etude?
I think overall the test has been quite successful. It could have been more interesting in points and I think it will benefit from some sound effects, but as a small test into animated anaglyphs it has provided me with great insight. In this animation there were a lot of blank surfaces and I used the same bland lighting throughout. For a future animated anaglyph I would use more textures, particularly bump mapped surfaces and produce a variety of lighting environments.
Filed under: Anaglyphs

I have created a short series of motion experiments using the Xidmary plugin in 3D Studio Max. I wanted to create an interesting experiment with 3D motion that would be unnatural in the real world. I am particularly happy with the section from which I took the above screen shot, the cloth sim would make a good flower. I found this quite rewarding, I would have liked to carry on getting more and more complex. I particularly enjoy the finale when one particle seems to fly straight at the audience.
The short was animated and rendered using 3D Studio Max and Vray using the Xidmary plugin. I rendered the animation from both Left and Right perspectives which instantly doubles the render time.

Then in After Effects I adjust the colour channels so that the Right image only gives off light in the red spectrum appearing black when viewed through the cyan eye of the 3D glasses and invisible in the red eye of the 3D glasses, and I adjust the channels on the Left image so that it only gives off light in the cyan spectrum making it invisible to your right eye and black to your left.

After I have done this I put the left image on a layer above the right image and apply a ‘screen’ blending layer effect to produce the screen shot that you can see at the top of the blog. If you are wondering why the colour is put back into the image when they are placed on top of one another it is because the combination of red and cyan makes up the complete RGB spectrum (cyan is green and blue combined).
Below is the link to the high quality Quicktime file, try to watch it full screen if you can.
Anaglyph Experiment Animation QT (640 x 480, 37mb)
Also for anyone who is interested:
Filed under: Anaglyphs
For my third etude, I will be experimenting with movement and anaglyphs. For this I will be producing a short 3D animation. I decided that if I were going to be experimenting with movement and anaglyphs it may as well be extreme movement!
I wanted to create something interesting rendered more or less photo realistic for the animation, however with the single frame test below the render time proved to be quite excessive. Below is the test I did with a tyre I had recently built as an experiment into displacement maps (the tyre tread). It took 20 mins to render each eye. An animation rendered like this, especially for a small test, would not be cost effective. I think the anaglyph effect applied to something in motion is really effective, I will be experimenting more with this for my third etude.

(click for larger view)
Filed under: Anaglyphs

(click for larger view) (check out the rebel in the green top, front row)
According to the ‘Anaglyph image’ Wikipedia article it is a common misconception that in the 50’s everybody watched 3D films (or with common TV knowledge, all films) with red / cyan anaglyph glasses. Apparently 98% of films of the 3D ‘golden era’ were an early version of the polarized 3D method similar to the one found in IMax.
I didn’t initially realise how much of an exact art anaglyphs are. Apparently with the cheap cardboard 3D glasses there is a problem with the red filter that makes the image slightly blurry. This is definitely true, if you look at any of the anaglyphs I have posted and close your right eye (cyan) the red image is very difficult to focus on and is quite uncomfortable. There are glasses you can get that compensate for this problem.
All the anaglyphs on ‘The US Geological Survey‘ website claim to have near perfect results compensating for all the known issues with anaglyphs and eye fatigue. Unfortunately I only have the standard cheap cardboard glasses, I can’t really tell the difference between these and any other anaglyph, but they have a really good collection.
Here is another wikipedia article detailing the history of 3D films, the technology, the creators, the successes and failures:
3-D Film Wikipedia
Filed under: Anaglyphs
Here’s another quick Xidmary Anaglyph. The plugin takes some configuring, and i’ve discovered b&w pictures work best. This is the most successful anaglyph i’ve made to date in terms of 3D effect.

(click for larger view)
Filed under: Anaglyphs
I found a new plug-in that lets you render from two perspectives in Max 8.
here is a very quick anaglyph i made with this new plugin:

Filed under: Anaglyphs

I found a commercial 3D monitor that uses polorized 3d technology, the same you get at IMax i think.
Filed under: Anaglyphs

I have always been interested in viewing images in 3d. Last year I got into rendering things out of 3d studio max so that they are viewable with 3d glasses. I achieved this with a plug-in called Stereographer Max. I wanted to expand a little on this for my 3d hybrids assignment by making a short animation, but the plug-in doesn’t work with the current version of max so I am currently looking for a newer version.
In the meanwhile, I have been experimenting with taking photo’s from two different angles and putting them together in Photoshop. Here are a couple of my most successful images:


(if you look under the juggling balls, there is a 3d dinosaur book that I bought last Saturday that inspired me to look into this again for hybrids (below is the stegasaurus)

Here is one I made last year with the Stereographer Max Plug-in:

I am still on the hunt for an anaglph plug-in that will work in 3D Studio Max 8 or later, if I still have no luck I may resort to installing an older version of Max to do it with.
How to Make an Anaglyph with Photoshop
Some Anaglyph Photography at the bottom
